Saturday, 30 January 2016

Getting Started with WiFi Module(ESP8266)

In this section we will see how to use this tiny little still most useful module ESP8266. Main reason for the popularity of this module is I think its price and its features. It is easily and cheaply available in the market for just ₹ 250-300.
The ESP8266 is a micro-controller from Chinese manufacturer Espressif that includes Wi-Fi capability.This small board allows micro-controllers to connect to a WiFi network. This little module can work in station mode, access point mode or both. Each ESP8266 module comes pre-programmed with an AT command set firmware.

First of all lets see the pins of this module. We can communicate with this module via serially. We can use either USB to TTL converter or you can use your Arduino board as I have used.

Pins of ESP8266 module 


Things Required are:


  1. BreadBoard
  2. Arduino Board
  3. ESP8266 WiFi module
  4. LD33CV IC ( 3.3V regulator IC)
  5. Resistors (1k & 2.2k)
  6. Some connecting wires

STEP - 1


As this module is not breadboard friendly, you need to follow the steps shown below before using this module.


Cut a piece of prefboard, and first solder female connector as shown in the fig below.


After that, solder male headers on the opposite side of the prefboard. It would look something like this.


Now attach the module on to the converter.


With this, it can be easily connected on to the breadboard.


STEP-2


Note: This module strictly works on 3.3V do not give 5V supply to this module.

As this module works on 3.3V we need to use a 3.3V regulator IC (LD33CV) or you can also use 3.3V pin from your arduino board. Even the Tx pin of arduino will provide 5V signal to the module. Hence we need to step down the signal to around 3.3V before feeding it to the module.

Connection of all this things is shown in the fig. below.
I have used the Rx1 and Tx1 of Arduino MEGA board. But you can even use the Rx and Tx pins. I have used this pins beacuse in my further WiFi projects, I have used TFT touch screen module, hence we won't be able to use pin 0 and 1.

Open Arduino software and open Multi Serial Mega example and change the baud rate to 115200 and upload the code. Change the baud rate in serial monitor to 115200 and the mode to Both NL & CR.

STEP-3

Now communicate with this module by sending the AT commands in the Serial monitor and play with this module.List of  AT commands are given in the PDF whose link is mentioned below.


I have also made a video on "Getting Started with ESP8266, As simple as possible"                                                                                


Datasheet of ESP8266
   AT Commands 


#techiesms

Monday, 25 January 2016

IR Protocol Decoding and Transmiting through Arduino

In this blog, I will described various IR protocols adopted by different companies and will go in detail about 2 protocols. One is the most commonly used NEC protocol and another is the Samsung protocol. Why??? Because I have Samsung TV which uses its own protocol and a GTPL setup box, which uses NEC protocol as simple as that.


Source: Wikipedia


Different Companies uses their own protocols for eg. we have protocols like Samsung, LG, RC5/RC6 by Philips,and the most commonly used protocol NEC protocol.


Lets discuss the two protocols in detail.


SAMSUNG Protocol


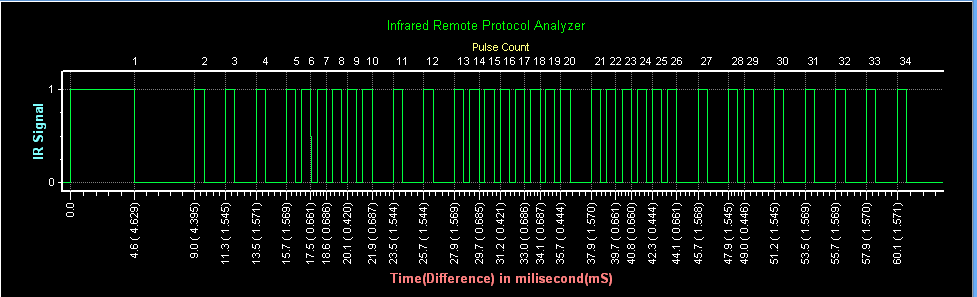
Samsung protocol goes in sequence like a start bit,8 bit address,8 bit address,8 bit data and inverse of 8 bit data. In total there are 32 bits after start bit containing address and data.Start bit of this goes like HIGH for 4.5 ms and LOW for 4.5 ms. Followed by this start bit, address and data bits are transmitted. Frequency of transmission is around 38 kHz. To be precise it is 37.9 kHz. Level HIGH and level LOW is decided based on the duration on the low level of the signal. Logic 1 and 0 is decoded like this:


IR signal of samsung protocol will look something like this, and its sequence goes like

start bit - Address - Address - Data - Inverse Data - stop bit

start bit- 11100000 11100000 00100000 11011111-stop bit
This signal contains address - 11100000   data - 00100000.


NEC Protocol


NEC protocol is most commonly used for IR communication. Its frequency of transmission is around 38kHz. The difference in samsung protocol and NEC protocol can be easily identified by the start bit. Samsung has 4.5 ms mark and 4.5 ms space while NEC protocol have a start bit of 9 ms mark and 4.5 ms space.


Another difference between samsung protocol and NEC protocol is that NEC protocol contains Address and inverse of Address after that while samsung protocol repeats the address twice. Logic 1 and 0 of this protocol is same as that of samsung protocol.


Decoding and Transmitting Through Arduino


Decoding this signal using arduino is very simple. We will use pulseIn() function to read the duration of the pulse and accordingly decide weather the received bit is high or low.

Things Required;

1. Arduino Board
2. TSOP IR reciever
3. IR LED 

TSOP IR reciever will give digital output of the IR data received on 38 kHz frequency. By default, it will give digital 1. 
Note: This receiver will give the inverse output. i.e. If IR signal transmitted is 0, than TSOP reciever will give output 1.

DECODING:

STEP 1:

First of all we will wait for the start bit of the signal. After that we will turn ON the led for indicating that IR signal is received.(This is the example of decoding a NEC IR signal).


STEP 2:

Than we will check that whether the received data is logic 1 or 0 and we will store that 32 bit data in a boolean array.


STEP 3:

Than we will separate address and data from this array. Now as we know that in NEC protocol the first 8 bits are the address and 17th to 24th bit are the data. Hence we will sort it accordingly.


Thats it. We have decoded the NEC protocol. Now lets see how to transmit it via IR LED.

TRANSMITTING

STEP 1:

First of all we will make a array of 32 bit and store the address in first 8 bits and the inverse of the address in another 8 bits. I am fetching the address value in integer from EEPROM.


STEP 2:

Than we will store the data and inverse of the data in the remaining 16 bits of the array.

STEP 3:

Than we will transmit this 32 bit data along with start bit and stop bit.Start bit of NEC protocol is HIGH for 9 ms and LOW for 4.5 ms. Here burst is the function which will send the HIGH signal at 38kHz frequency.


Burst is the function which will send pulses at 38 kHz frequency. Value of the burst signal may vary because of the time delay of the instructions. So I have tried by different divisions, and finally the transmitter was working when I divided the HIGH time delay by 38 for which actual dividend by calculation comes out to be 26 (9 us+17 us).

That's it. You are done with the decoding and transmission. You can even store the codes of the remote sequentially in the EEPROM and than transmit the code by fetching the data from EEPROM.
The pics in this blog are example of NEC protocol. I have attached link of a code for decoding and transmission  of code of Samsung protocol.

Further I am trying to make a self learning universal remote control which can simply copy the code into the memory and can be able to transmit the same signal. So that the issue of different protocols will be nullified.If any one have any idea regarding learning remote, do mail me.


Arduino Files:

Samsung Protocol Decoder
Remote Transmitter


#techiesms

Saturday, 26 December 2015

HeartBeat sensor


             "Heart Beat Sensor" sounds very complicated to be made.But its not the reality, it is the most simplest medical device to make at home using very few components.


Heart Beat Sensor


 Components required to make a Heart Beat Sensor are:-

Components
  1. Proximity Sensor
  2. LM 358 IC
  3. 4.7uF and 100nF Capacitors
  4. 47k,6.8k,680k, and 1k resistors.
  5. Some LEDs.

            
             First let us discuss the connection of the circuit. 
  • First we need to connect the proximity sensor with transmitter in forward bias and receiver in reverse biased. 
  • After that fed the signal of from the receiver to High Pass Filter.
  • Than amplify this signal by feeding the signal into Non Inverting Amplifier.
  • Output of the amplifier will be pulses proportional to heart beat.
  • If we want to fed the signal into controller, than we will require an additional buffer amplifier.

Circuit Diagram


Now, discussing some theory of this circuit. Logic behind this is that when our heart beats, the blood circulates in our body. Due to this, their is minute volume change of blood on our index finger. Hence when we place our finger on the proximity sensor, that sensor senses that volume change and gives signal accordingly.

But this signal is very weak to even drive an LED. Hence we connect an Amplifier to amplify this signal. On the output of the amplifier,we will get the pulses which will be proportional to the Heart Beat. Our Heart Beats will be indicated by the LED connected at the output. 

Further if we want to fed this signal into the micro-controller, we need to attach an additional buffer to this circuit. In the micro-controller we can code that controller so that we get exact value of our Heart Beat.


So this is all about making your own Heart Beat Sensor. You can even watch my tutorial video on this in which I have made this sensor using SMD components. The link of the video is mentioned below.

Make a one for yourself and if you like this project, than share it with others.


#techiesms


Sunday, 20 December 2015

3D Hologram Projector.


             3D hologram projectors are pretty cool. They may seem to be very complex technology and they really are. But there is a very simple way for you to make one yourself. At your home.Just have a look.

 Their exists a strategy for turning smartphones into 3D hologram projectors that involves a plastic CD cover, a glass cutter, a sheet of paper, some tape, Strong glue and a pen.


Things Required

Draw a trapezium on the white paper with dimensions 1cm x 3.5cm x 6cm.

Draw this shape on paper.


Cut the trapezium with the help of the cutter.

                                           Cut the shape.


Take an CD cover and carefully cut out the edges.

Cut out the edges


Cut the shape and cut 3 more such pieces.

Cut four such pieces


Stick them together with the help of the tape.

Stick them together with tape.

In the end, apply strong glue at the junction and remove the tape.

Remove the tape after applying strong gule,
Now place it Upside down on your smart phone and play the hologram video.You can even make our own customized videos as I have made.


Holographic video of Myself
             Try to make out one for yourself and experience the magic of Technology.I have made the tutorial video for this, Just have a look.


Tutorial Video : https://www.youtube.com/watch?v=7cM1Z_1ddX4

Hologram Sample videos: https://www.youtube.com/watch?v=Y60mfBvXCj8


#techiesms

Thursday, 17 December 2015

SMART MANDIR's Journey


               The whole concept,working and public reviews are their in the videos. But I'll talk something about which is not their in the videos. Something like behind the scenes of  SMART MANDIR. I'll share my experience of making this project to reality.
            
          SMART MANDIR DIARIES


Navratri is on head. Think something innovative this time for the decoration of mandir.” My mother asked.

I started working on it. Initially, the only thing that struck the mind was to decorate the mandir, simply with LED strips along with arduino, coded with different patterns that run continuously. I was still not contented.

“How about a high end humanoid robot that offers prasad to all devotees, same as my mother do after aarti ends???” I thought.

Finally, I came up with an idea.
I remembered a line follower car which could work as robot in my project. I started thinking about how to arrange things that would amaze all. Many ideas and thoughts crowded the room of my mind.

It was time for some action.
I called up my friend AKSHAY who is a great coder and a great Techie. We discussed lot together regarding the project and it was no time for Navratri, just 2 days left.

 Firstly, we completed the creative part - decorating the mandir. It was already one day down; we started working on the second part of our project - the core part i.e. Coding and Debugging.

Every great idea requires great efforts.

We tried numbers of codes to make our project look automatic and hassle free. We failed every time trying new codes.

As great THOMAS A EDISON said, “Our greatest weakness lies in giving up. The most certain way to succeed is always to try just one more time.”
We tried once more and not ended trying till we got it. Finally, the idea turned to reality.

I looked at my friend AKSHAY, we smiled…


Two days of hard work, two days of dedication, two days of creativity and coding, two days for ‘SMART MANDIR’.

#techiesms

Saturday, 12 December 2015

Make your own Power Bank

 Project video  https://www.youtube.com/watch?v=jEUaCI7iqm0
Project video  https://www.youtube.com/watch?v=jEUaCI7iqm0


"Making our own power bank" sounds interesting but what is the use of making the thing which is easily and cheaply available in the market???

            First of all I would like to tell you that the cheap power banks of local brands available in the market , most of them uses the degraded batteries in the power bank and hence those power banks fails to charge the phone or gets exhausted by charging 4-5 phones. So I would prefer you to buy powerbank of trusted brands only.

             But those branded power banks costs a lot and here comes the importance of making our own power bank.


Advantages

> Cost is less.
> We can increase the capacity to whatever limit we want.
> We can make our own customised casing(Outer body).
> If battery's charging cycles exceed it's limit, than we can just replace the battery and we get the whole new power bank.


Things required

1.LiPo battery.( I have used a 5500mAh LiPo battery.) 
2.DC - DC boost convertor module.
3.LiPo battery charger module
4.Card board board ( for casing)


LiPo Battery


These are very slim, extremely light weight batteries based on the new Polymer Lithium Ion chemistry. This is the highest energy density currently in production.Do not attempt to charge these with anything but a specialized Lithium Polymer charger. All the smart phones, Tablets and even wearable uses this type of batteries.


DC - DC Boost Convertor Module

This module takes 0.9V-5V as input and boost up the voltage to 5V. Output current of this module is 600mA. In market, different types of modules are available but I will prefer you to buy one with attached USB port so that you don't need to solder them separately.

This is the link from where I have ordered this module:
http://www.ebay.in/itm/like/151842274404?aff_source=Sok-Goog

TP4056 Lithium Polymer battery charger module


 The TP4056 IC is a complete constant current/constant-voltage linear charger for single cell lithium-ion/Lithium Polymer (LiIon/LiPo) batteries. Its SOP-8 package and low external component count make the TP4056 ideally suited for portable applications.Furthermore, the TP4056 can work within USB and wall adapter. Other features include current monitor,under voltage lockout, automatic recharge, and two status pin to indicate battery charging(RED LED), and full charged battery (BLUE LED).

Note:It is preferred to use this type of specialized charger rather than any 5V charger otherwise it may harm the battery.

This is the link from where I have ordered this module:
http://www.amazon.in/gp/product/B00EQ0ZS0M/ref=pd_lpo_sbs_dp_ss_3?pf_rd_p=733112647&pf_rd_s=lpo-top-stripe&pf_rd_t=201&pf_rd_i=B00JQ2VG1A&pf_rd_m=A1VBAL9TL5WCBF&pf_rd_r=1PFTA13R87FFB1P7W4DX
  

             This is all you need for making your own power bank. If you still not cleared about this, just watch the video of Making your own POWER BANK" whose link is mentioned below.

             Hope you got the idea regarding power bank. 

Link of this project video is:

Friday, 11 December 2015

E-Wand

         
  I was thinking of making something like magic using electronics. And the rest is history.


You must have seen Harry Potter movie, in which Harry used to do magic by just  pointing towards the things. And inspired by this, I with the help of my friend made the magical wand name E-wand the Electronic-Wand. Use this wand to turn On and Off the appliances by just pointing towards them. Just like Magic.......

Story behind this is that, I was thinking of a project that feels like magic. Thinking under this topic I came with an idea of making a wand just like that we see in animation movies or like one the magicians have inside the wand will be electronics part like a sensor which will provide the coordinates,a micro-controller which will control all the functions and a RF section which will communicate with other devices.

I discussed this idea with my friend Akshay, he suggested me using Smart phone and its inbuilt sensor instead of that wand because making the controller,sensor and RF module to get fit inside the thin wand would be quite difficult and complicated. So we went through research that how we can access our Smart phone's sensor for our use. We cam across an app named SENSODUINO through which we can send the data of our inbuilt sensors to the controller via Bluetooth. This is all we wanted at the transmitter part. On the receiver part i.e. appliances , we have connected a controller, Bluetooth module and a relay module. After doing simple programming our so called E-wand was ready for doing magic.


Sensoduino

https://play.google.com/store/apps/details?id=com.techbitar.android.sensoduino&hl=en

e-wand
https://www.youtube.com/watch?v=xoR3jrqzHOs

#techiesms